
Thursday, February 27, 2020
2003 Harley Sportster Chopper Wiring Diagram
Been helping a buddy get his 883 built and we are just about to the point of wiring it up. We are going to be using pieces of his stock harness so I took the factory wiring diagram and worked up this chopper wiring. The only thing he wanted to keep was the neutral light. Cool thing is that we can cut up and use the factory harness as this diagram keeps all the Harley color coding. Should be good for more than just a 2003, but this one is specifically for all 2003 XL's except the 1200s.

1980 Harley FXWG Chopper Project
Wow! I guess it's been a really long time since I've updated my blog. Just looked at it and realized the last post was when I first got my new project. Since then, I've just about completed the 1980 and am getting it ready to go to the Hand Built Show is Austin TX. Here's how she sits now. Sorry for not posting the build progress!


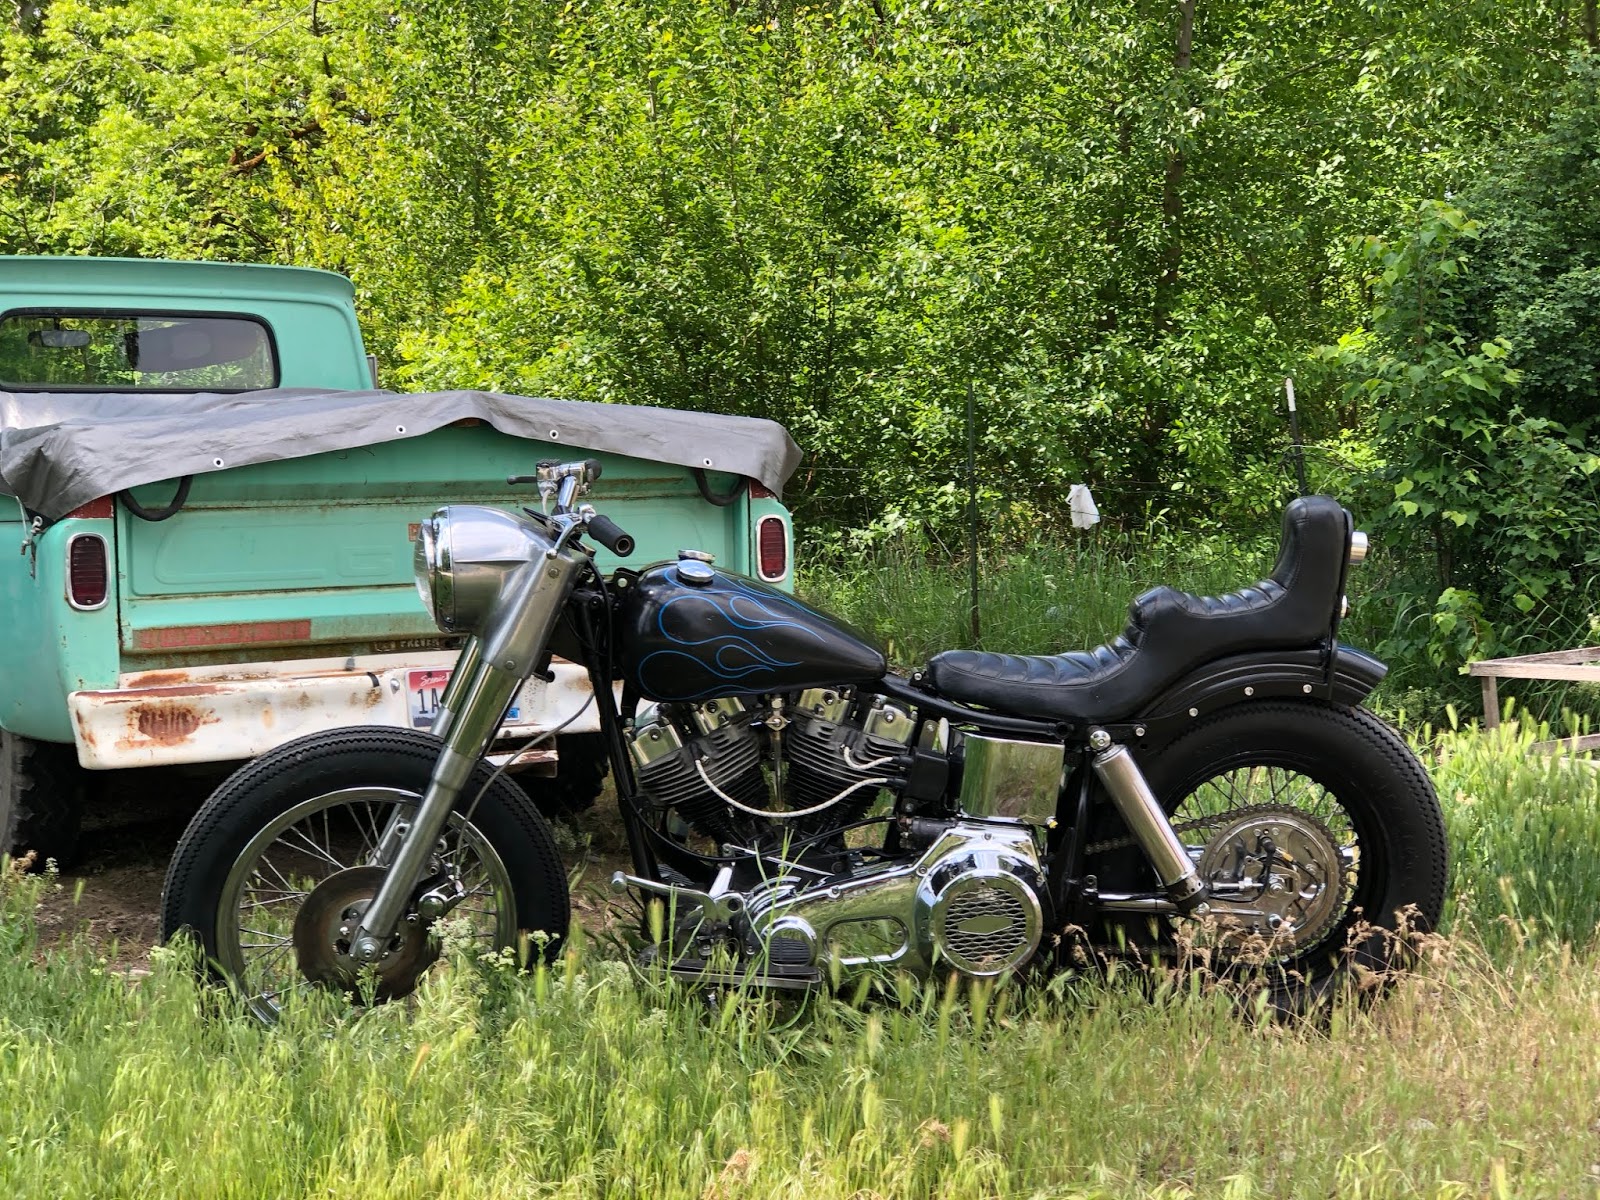

Wednesday, November 28, 2018
1980 Harley FXWG Swingarm Chopper Project 1
It's been a long time since posting here. Considered shutting down all together but low and behold, I picked up a 1980 Wide Glide the other day. It's my first foray into the big twin world so we'll see how it goes. The bike was a basket case but seem to be in good shape. Got a bunch of parts on order. Cool stuff planned.


Thursday, December 15, 2016
1975 Honda CB125S Brat Seat Foam and Gas Tank
Got a little work done today. Stripped and cleaned up the tank and got the seat foam glued on and shaped. Need to get a couple things before I can start sewing the seat cover but will hopefully get it done this weekend.


Monday, December 12, 2016
1975 Honda CB125S Brat Tachometer Plug
I think I've decided to run sans gauges. Really just for the clean look, not for any practical reason. With that in mind, I needed to plug the tachometer hole in the motor. I keep scraps of aluminum around for just this reason. I chucked some up in the lathe and got my dimensions.

Got my initial turning done and scribed some lines to locate the groove.

I drilled a 1/4" hole in the middle and then left a lip at the top to make it easy to get out.


Once I tried to fit it, I realized that the motor clearance would not allow me to have a lip on the top so I had to remove a little material. Put a little sealer on it and installed the new plug.

Saturday, December 10, 2016
1975 Honda CB125S Brat Headlight
I've been really struggling trying to figure out what to do for a headlight. I knew that I wanted to use the original if I could but after looking at the options for headlight mounts, I wasn't satisfied and knew that I'd have to make my own.
I took an aftermarket mount for a CT70 that I had around because it never fit any of my bikes. I took two of the clamps off and bored them out on the lathe to 27MM to fit my CB125 forks.

I then took a piece of 3/8" rod and drilled and tapped each end to fit the 6mm bolts from the headlight mount.

Next was how to actually mount the headlight. I had some flat bar around the shop so I took a piece of that and put in on the roller until the radius matched that of the headlight bucket. I knew that if I just welded it to the rod it wouldn't have much contact, so I cut out a center section so I could sink it in a bit and get more contact.

After welding the two pieces together, I took a flap disc to the inside to smooth it out and just improve the look a bit. It's not super pretty but it didn't cost me any money and only took a couple hours to make. That's a win in my book.

Bolted the headlight to the mount and I've happy with the way it turned out. Still have enough room above to mount the speedo and it's not too complicated. Throw some paint on it and I think it'll be pretty slick.

I'm happy with how the bike is turning out. I've only spent $40 on parts so far which has got to be the cheapest I've built a bike. I'm going to be making a custom aluminum tail light on the lathe so stay tuned for that. After that's done, I'll do a post on shaping my seat foam and sewing a nice leather cover.

Thursday, December 8, 2016
1975 Honda CB125S Brat Rear Fender and Bars
Time to start on the rear fender. I had planned to use a Triumph front fender on the rear however after thinking about it, I liked the idea of using the original fender and just cutting a section out of the middle, grafting it together and throwing on there. Here's how I did it.
Started with taping off where I wanted to cut both on the front and rear of the fender.


Holding the two pieces together by hand to see if I like where it sits. Looks good to me. Time to slap some weld on there and throw it on.

I welded a piece of flat bar across the hoop and drilled a couple holes to mount the fender. I like that it sits a little longer than the average brat/cafe bike. Don't want a dirty stripe up my bike while I'm riding in the wet.

My bars also came in today. They were a bit wide so I cut 2" off each side.

Subscribe to:
Posts (Atom)